Techniques of photographing landscapes, objects, and night scenes with a pinhole camera
This article explores the nuanced art of using a pinhole camera to photograph landscapes, objects, and scenes at night. It provides insight into the required equipment, techniques for achieving clear and compelling images, and tips for both beginners and seasoned photographers looking to delve into this traditional form of photography.
Photographing of night scenes with a pinhole camera
Pinhole cameras are not „fast” even during a day, so pinhole photography at night might be a challenge and you need to prepare for it. Few things will be helpful. First – sturdy tripod. Exposure might take even few hours, stable tripod help to avoid shaken images. It’s worth to carry heavy tripod even if you have small and light pinhole camera. Next thing is high sensitivity film. 800 ISO film will be much better thant 100. Remember also about Schwarzshild effect and reciprocity failure. At very long exposure times, when light is very poor, exposure time must be extended. Factors for particular negatives are provided in online calculators and software like Pinhole Designer. You can check data sheet provided by manufacturer of sensitive materials.
I strongly recommend to check that factors, because exposure time including them are many time longer than measured using only lightmeter. Different films require different factors to extend exposure time. Usually it is reguired, when mesured exposure time is longer than 1 second.
Third factor for night shots is also important- your patience. Exposure may take few hours, so you have to be patient. Find also safe area to place the tripod.
Below i attached two shots taken from my balcony. First one is a 24x65mm panoramic zone plate image. This is one hour exposure at 100 ISO film taken on new years eve few years ago. I started exposure before midnight.
Second one, taken from the same spot at dusk on photographic paper. I guessed exposure time, it was around two hours. In summary- shooting at night wuth a pinhole camera is not so complicated as you might think- basic equipment and some of patience is required. And remember- there is no exposure time, which is too short at night 😉
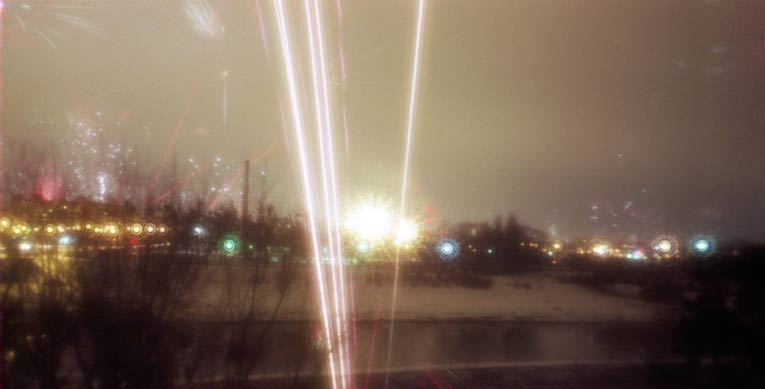
24x65mm zone plate image. One hour exposure at midnight, new year eve.
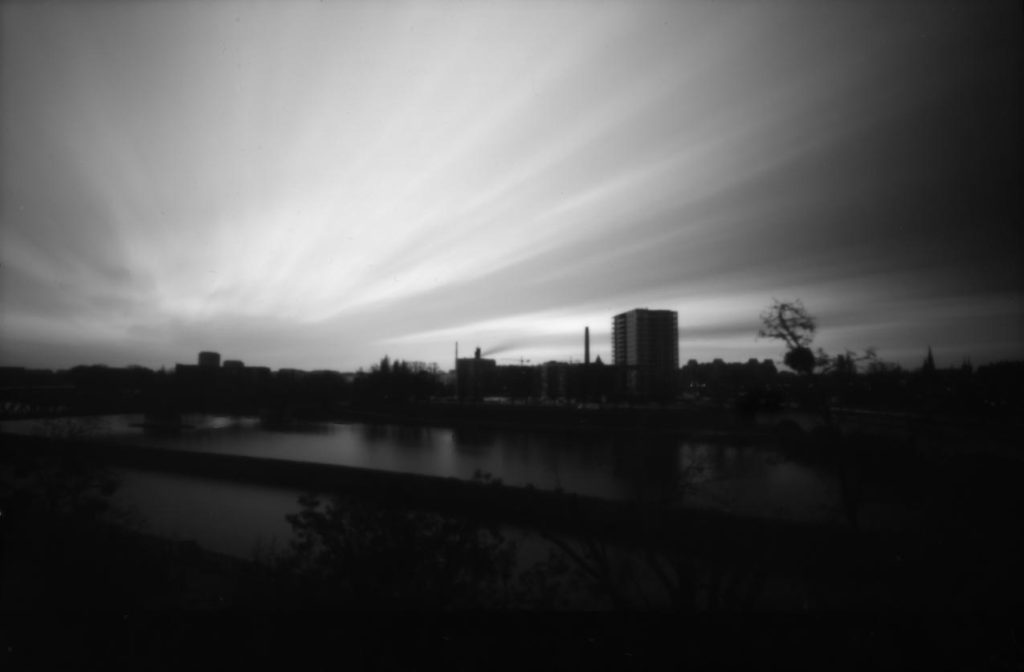
Two hours exposure at dusk, pinhole camera loaded with photographic paper.
Read also: how to take photos witha a pinhole camera?
Pinhole photography of landscapes
Landscape is beside architecture one of most popular themes of pinhole photography and i like to share here some of my experiences. Hope that my advices will be helpful.
I am not a „orthodox” with pinhole photography of landscapes and sometimes i use square format cameras, but i think that cameras with wider aspect ratio -like 1:1,5 and 1:2 or even 1:3 are more suitable. So, basic equipment will might be 6x9cm camera. 6x12cm panoramic cameras are usually flat plane, but 6x17cm frame size are curved plane.
What will we need for photographing landscapes with a pinhole camera? Except pinhole camera it is required tripod with spirit levels and filters.
Spirit levels allow to set the camera in exact hrizontal position. Curved plane cameras require also to set them flat on both axis (left-right and front-back). Horizont will be not flat, if we miss that setting.
Filters are not essential, but using them may give more interesting and better quality pictures. For colour films basic filters are UV and polarization filter. First one cut unwanted UV and help to avoid blueish shade on landscape shots. UV filter also increase a little contrast. Polarization hilter remove reflections from all elements of captured scene- metal, glass surfaces, but also from water and leaves. Blue of the sky is deeper and colours more intense.
For monochrome films basic set of filters for capturing landscapes is: yellow, orange and red. Yellow filter makes sky darker and clouds better visible. It increase also general contrast. Orange and red filter work similar way, but effect is stronger. Sky photographed in sunny day with red filter is almost black.
We can also use neutral grey on both types of film (colour and monochrome) to get nice motion blur effects during windy days.
Check the shop and buy a pinhole camera!